Pages

Monday, December 6, 2010

Beetroot Whoopie Pies


It was an exhausting week and I'm glad it's over.

Last tuesday was set to be the kitchen demolition day, although we didn't ruin the entire kitchen but almost. We had brand new counters and cupboards made by Ivan and his father and there was only one old thing left in the kitchen that was supposed to be gone – a 35 years old huge concrete counter moulded like a sink that looked like a huge wash tube. As a sink it was very comfortable to use it, but it was so ugly, and huge – more than 2 metres long, and ugly. Did I mention how ugly it was?

Monday night, we had to move all our kitchen possessions into the hall - tools, implements, tableware, all kind of food provisions, small kitchen appliances and whatever one could think of that has its place in the kitchen. The bigger appliances had to be carefully covered with nylons.

While moving things here and there we decided to make some food for the next day workers. We baked two dozens of burger buns. I made potato fritters, Ivan made some meatballs – for vegetarian and carnivore burgers. And in all that fuss I decided I'm in a mood for baking something sweet. Why not to use the two beetroots that I was looking in which box to put. This is how these whoopie pies were born. The piping bag was already somewhere in the boxes so I had to scoop them with a spoon - it's why they are so dishevelled. But as this was an improvised late last minute baking I don't mind it. 


Beetroot Whoopie Pies Recipe:
  • 160 gr cake flour;
  • 1/3 tsp salt;
  • 1 Tbsp baking powder;
  • 1 egg;
  • 75 gr dark brown sugar;
  • 50 gr white granulated sugar;
  • 80 ml vegetable oil;
  • 240 gr beetroot puree.
Preheat the oven to 180º C.
In a bowl sift together flour, salt and baking powder. Set aside.
Beat the egg just until frothy. Add the vegetable oil and the two types of sugar, then the beetroot puree and beat until homogenous. Whisk in the flour mixture just until combined.
Using teaspoon drop small piles of the mixture on a silpat lined baking pan. Bake for about 15 minutes or until a toothpick inserted in the middle of the pies comes out clean.

For the Beetroot Puree:

Wash 2 beets really well using a kitchen brush. If there are any leaves, cut them off the beets leaving about 2 cm stem on. Place the beets in a pot with simmering water and simmer for around 50 minutes or until fork tender. Discard the water and let the beets cool. Peel them and puree them finely in a food processor. Measure out 240 gr of the puree. Freeze the rest or use for something else.

For the Filling:
  • 190 gr cream cheese;
  • 60 gr butter, softened but not melted;
  • 60 gr powdered sugar.
Whisk butter and sugar, then add the cream cheese and mix until homogenous. Couple the cookies with a good twist of the cream.


Sunday, November 28, 2010

Kiflice – Mini Cheese Rolls - Fresh from the Oven


Kiflice, although called differently in the different countries, are a very Balkan breakfast. They were chosen by Maja from Cooks and Bakes as this month's Fresh from the Oven challenge. Maja is a Serbian, i.e. she is a neighbour of ours.

After having Chelsea buns, which are a typical British breakfast, last month, it was interesting to see a typical Balkan one.

I always tend to overfill those rolls so there is always some leakage but I love them with extra cheese and can't restrain myself of overstuffing them. Here for the filling I used white brine cheese mixed with savory and a spoon of yoghurt as the cheese was a little bit hard.
I mixed the dough late in the evening and made the rolls the next morning for breakfast.

Overall, I found the dough recipe very very good and the baking with the additional butter makes the rolls crispy and crunchy.

Come and check out the Fresh from the Oven site to see how everybody did it.


Kiflice Recipe:
Makes 40 mini cheese rolls.

For the Dough:
  • 500 g all purpose flour;
  • 10 gr salt;
  • 20 gr fresh yeast (2 tsp instant yeast or 2.5 tsp active dry yeast);
  • 1 tsp sugar;
  • 250 ml milk;
  • 75 ml sunflower oil(or any other neutral vegetable oil);
  • 1 egg;
For the Filling:
  • 200-250 g cottage cheese (you may use feta or other fresh cheese);
  • 1 egg white (optional).
And More:
  • 1 egg yolk;
  • 1 Tbsp milk;
  • 100 g butter.
For the starter - dissolve yeast with some lukewarm milk in a cup, add a teaspoon of sugar and a tablespoon of flour, stir to get smooth batter. Set aside at room temperature, or near the stove top, to let the yeast activate and fill the cup.

Sift the flour, add salt. Add activated yeast, egg, oil and milk, then combine using a wooden spoon to get smooth dough. The dough seems like too soft and too sticky at the beginning, but don't worry, continue with kneading, and soon your dough should start to separate from the bowl, and thicken. It is not necessary to knead the dough by hands, the wooden spoon works just fine. Grease the cling film with oil, cover the bowl, and set aside for at least an hour, at lukewarm place, to let the dough doubles in size.

Crush the cheese using a fork. Add some salt if it tastes neutral. Stir the egg white in, if the cheese is too crumbly. Filling shouldn't be runny, but thick and compact, thicker than the cream cheese.

Re-knead the dough, divide into 5 equal parts, shape them into balls. Each part should make 8 rolls, so you'll end up with 40 rolls, which should perfectly fit the regular oven pan, if lined in 5x8 order. Flatten each ball by hands over the floury working surface, then use a rolling pin to roll the dough out in a circle, a few millimetres thick. Use a sharp knife to cut the circle into 8 triangles. Take one triangle, stretch it in the air with your hands, to get it extended as much as you can, gently. Put some filling at the triangle base, then fold the edges of the base(look at Maja's blog for more instructions), to avoid the filling leak out during baking. Roll. Arrange the rolls at the pan (5x8).

Lightly beat the egg yolk with a tablespoon of milk, then brush the top of each roll with the mixture. This is used to prevent forming thick crust, and to improve the colour of baked rolls. Sprinkle with some sesame seeds, if you like.

Arrange the small pieces of butter between the rolls, then bake in the oven preheated to 180°C for about 20 minutes.


Saturday, November 27, 2010

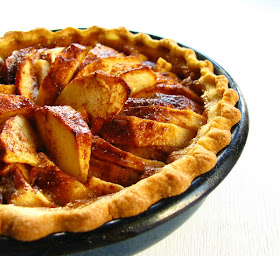
Apple Crostata


November Daring Bakers' challenge was to make a crostata, and the first we thought about was apple one, since we were loaded up with apples from Ivan's uncle front yard.

The challenge was hosted by Simona from Briciole. I planned to post it earlier today but we were invited to have a tea with our friends Dessie and Nikolay and we had a wonderful lazy day with honey cookies, apple cake and brioche rolls made especially for us from Dessie's mother.


Apple Crostata Recipe:

For the Pasta Frolla:
  • 90 gr powdered sugar;
  • 235 gr cake or all purpose flour;
  • a pinch of salt;
  • 115 gr cold unsalted butter, cut into small pieces;
  • grated zest of half a lemon;
  • 1 large egg and 1 large egg yolk, lightly beaten in a small bowl
Whisk together sugar, flour, lemon zest and salt in a bowl.

Rub or cut the butter into the flour until the mixture has the consistency of coarse crumbs. You can do this in the bowl or on your work surface, using your fingertips or an implement of choice.

Make a well in the center of the mounded flour and butter mixture and pour the beaten eggs into it.

Use a fork to incorporate the liquid into the solid ingredients, and then use your fingertips.

Knead lightly just until the dough comes together into a ball.

Shape the dough into a flat disk and wrap in plastic wrap. Place the dough in the refrigerator and chill for at least two hours. You can refrigerate the dough overnight.

Butter and dust with flour a 22,5 cm pie dish. We used a 20 cm baking pan and had some extra dough enough to make a small apple galette. Roll out the dough on a lightly floured surface then line the pie dish with it. Pinch the pie crust with a fork. Add the filling.

For the Filling:
  • 3 big apples, peeled, cored and cut into slices(I don't know what kind of apples we used but these beauties were pretty big.);
  • juice of half a lemon;
  • 1 Tbsp corn starch;
  • 70 gr mascarpone (or cream cheese);
  • 35 gr dark brown sugar;
  • 25 gr granulated sugar;
  • 1 tsp cinnamon;
  • ¼ tsp ginger;
  • ¼ tsp clove;
  • 15 gr butter.
Preheat the oven to 180º C.
Combine lemon juice and corn starch and pour over the apples. Toss them to distribute the liquid evenly.

In a small bowl, combine the two types of sugar, cinnamon, ginger and clove.

Spread the mascarpone evenly over the pie crust. Sprinkle half of the sugar mixture over the mascarpone and arrange the apples on top. If there is any lemon juice left, discard it. Sprinkle the rest of the sugar over the apples. Dot with the butter on top.

Bake for approximately 50 minut. If the top starts to burn, cover it with a baking paper.
Leave the crostata for at least 4 hours before slicing, thus all the juices from the apples will set.


Thursday, November 18, 2010

Hibiscus Macarons with Mascarpone-Butter Cream


Our friends Ann and Becky sent us a huge bag of these beautiful enormous dry hibiscus flowers from Egypt. This is the best hibiscus tea we've ever tried – profound and intensive flavour, deep rubious colour and concentrated flowery acidulous taste. But it would be a sacrilege to use these gems for just making tea. Candied flowers, hibiscus jelly or reduction sound quite tempting too, but first of all we decided to use two of their main characteristics – nice deep colour and this flowery acidity - and made some hibiscus macarons.

Hibiscus tea contains 15-30% organic acids and this acidity combines in a perfect harmony with the sugary sweetness of the macaron shells. Besides it gives this completely natural purple colour.

Since the macaron shells are sourly sweet, they pair well with a rich cream as a butter-mascarpone one.


Hibiscus Macarons Recipe:
Makes... (these were so good that we ate a good amount of them before even pairing them and forgot how many they were)

Note: For the meringues we used the following proportions - 1,3 gr almonds / 2 gr sugar per every gram of egg whites.
All the ingredients were weighed out after dehydrating.

  • 110 gr egg whites (3-days aged);
  • 20 gr granulated sugar;
  • 143 gr blanched almonds;
  • 220 gr powdered sugar;
  • 15 gr dry hibiscus flowers;
In a mortar grind the dry hibiscus flowers to a fine powder. If needed sieve it as there are not so fine particles that remain.

In a food processor grind the almonds till coarse semolina size. Add in the powdered sugar and grind finely. Add the hibiscus powder and pulse 2-3 times to blend. Sift the mix to remove any clumps.

In a large bowl begin beating the egg whites on a low speed. When they are foamy gradually add the granulated sugar. If necessary increase the speed to medium (but not high). Beat till glossy meringue.

Remove the beaters. Add the almonds/sugar mixture in two or three times and fold carefully until homogenous.

Line a baking pan with paper. Pour the batter into a pastry bag fitted with a plain tip (we use № 7) and pipe about 2cm large rounds (we prefer even smaller “one bite” macarons) leaving 2cm space between them. Tap the pan on the counter several times to bring up any air bubbles.

Let the macarons rest for 30 – 45 minutes to form a skin. At the end they should not be tacky on touch.

Preheat the oven to 150º C. When the shells are no more tacky on touch, bake for around 10 minutes or until they seem done.

Remove from the paper and let cool on a wire rack. (If not using immediately, store the shells in an airtight container.)

Mascarpone-Butter Cream Recipe:
  • 50 gr butter (room temperature);
  • 100 gr powdered sugar;
  • 150 gr mascarpone.
Combine sugar and butter and beat until creamy and fluffy. Add the mascarpone and beat until homogenous.

To assemble: Fill a pastry bag with the mascarpone-butter cream and couple the macaron shells with a good twist of cream. Store the macarons in an airtight container in the fridge. Let them rest for 24 hours before eating.


Sunday, November 14, 2010

Gluten Free Chocolate Cookies


We admit it, we aren't great gluten free baking fans, but it's so trendy recently, that makes us curious to try it.

Besides we wanted to surprise our friend Svetla who became gluten intolerant after her first pregnancy. Now she is pregnant with her second child and she is craving more than ever for cookies and crackers. So we examined several gluten free recipes in quest for the perfect one. But considering that when it comes to food Svetla is a really picky eater we decided it would be better to make a recipe specially for her. And here it is.

Gluten Free Chocolate Cookies Recipe:
  • 50 gr millet flour;
  • 60 gr rice flour;
  • 50 gr corn starch;
  • 30 gr dutch processed cocoa powder;
  • pinch of salt;
  • 1 Tbsp baking powder;
  • ½ tsp (2 gr) gum arabic(powdered);
  • 1 tsp (4gr) gum guar;
  • 125 gr butter;
  • 95 gr granulated sugar;
  • 55 gr jaggery(liquefied or finely chopped);
  • 1 large egg;
  • 50 gr raisins;
  • 50 gr milk chocolate chips.
In a bowl, mix the flours, corn starch, cocoa powder, baking powder, gum arabic, gum guar and salt until uniform, set aside.

Beat the butter, sugar and jaggery in a large bowl until creamy and fluffy. Beat in the egg. Whisk in the flour mixture, stir in the raisins and the chocolate chips until soft drop-cookie dough. Refrigerate for 30 minutes. Meanwhile preheat the oven to 170ºC. Lightly butter a baking sheet or prepare a silpat.

Drop by rounded tea or tablespoonfuls of the dough onto the baking sheet or silpat. Space the heaps about 3 cm apart. Bake for 10 to 15 minutes (depending on the size of the cookies), or until the top is dry and a little bit cracked but the insides are still quite soft.

Cool for 5 minutes on the baking sheet, afterwords transfer to a wire rack to cool completely.

Notes: Right after taking out of the oven these cookies are really soft and fragile, but don't worry they will set up after several minutes when cooled.

You can substitute 1 tsp of gum xantan for gums used here.

You can substitute dark brown sugar or honey for jaggery but the jaggery gives a smoky flavour and prolonged aftertaste.

Thursday, November 11, 2010

Chocolate Salted Caramel Tart


I had a great story to tell you about these tarts involving me and my sister in Paris, a scrumptious round of Camembert grillé and a crunchy baguette, a long walk on foot from my sister's tiny apartment at rue Miollis (15ème arrondissement) to rue Cail (10ème), samosas at Krishna and shopping spices at Ganesha, then on our way back dropping ourselves in a small local pastry shop (not as trendy as Hermé or Aoki, but with it's own charm) for these little salted caramel life boosters and a looong walk on foot (again) to rue Cler(7ème) for a late Friday night Mojito with friends. Yup, comfy shoes on our feet and large smiles on our faces – this is all we needed not to care about the rain nor the cool winter wind.


But the cursor was blinking nasty on the white page and although my head was full of stories, nothing was coming out of my fingers on the keyboard. After a week the page was still white and the cursor was still blinking as if laughing at me.

I like food related stories and memories. But this block went on too long and since obviously I've sank in a deep writer's whiteness and there is no story coming out of me, I'll be happy to hear your salted caramel stories.


Chocolate Salted Caramel Tart
Recipe:
Adapted from Vanilla Garlic
Makes 6 small 8-cm tarts or one big 22-cm tart

For the Crust:
  • 110 gr butter, softened;
  • 100 gr sugar;
  • 1 large egg yolk;
  • 130 gr all purpose flour;
  • 30 gr dutch processed cocoa powder.
In a large bowl, beat butter and sugar until creamy. Beat in the egg yolk. Combine the flour and cocoa powder and add them to the butter mixture. Mix in until it just comes together. Roll out the dough or form it just pressing it with your fingers into 6 8-cm rings laid down on a paper lined baking tray. Fridge the tarts shells for an hour to set. Meanwhile preheat the oven to 180º C. Prick the tart shells all over with a fork and blind bake until cooked through, about 15 minutes. Cool on a wire rack.

For the Caramel:
  • 125 ml water;
  • 400 gr granulated sugar;
  • 60 gr glucose;
  • 125 ml heavy cream;
  • 110 gr butter (if using salted butter skip the salt below);
  • 15 gr flaked sea salt.
In a saucepan, whisk together the sugar, glucose and the water and bring to a boil. Salt can be added at this initial step (skip if using salted butter), but I prefer to add it at the end in order to preserve the salt crystals. Cook without stirring until amber colour, if using a candy thermometer it should reach 180º C . Remove the pan from heat and whisk in the butter and the cream until smooth. Pour caramel into cooled tart shells and refrigerate until firm, around 4 hours.

For the Ganache:
  • 120 gr heavy cream;
  • 120 gr high quality dark chocolate (we used Cacao Barry's Tanzanie);
  • Sea salt or kosher salt for garnish
Bring the cream to a simmer. Then pour the hot cream over the chocolate. Wait for a minute, then stir to obtain a smooth ganache. Pour the ganache evenly over the tarts and refrigerate for further 4 hour. Before serving sprinkle with sea salt, but not before as it will melt away.

Tip: If you have any caramel left, wait till it hardens, then tear small pieces of it and dip them in dark chocolate.


Thursday, October 28, 2010

Chelsea Buns Fresh from the Oven


For this month's Fresh from the Oven challenge Wendy of Notes from the Quirky Kitchen got us baking Chelsea Buns. Most of FFO members are English natives and everybody was familiar with these buns. Apparently this is something they teach the kids in the UK during the school cookery lessons and everybody from our baking group seems to have warm memories from that time. But we are Bulgarian guys and during our cookery lessons we were taught how to make things like tarator (a cold soup of yoghurt, cucumber, dill and garlic), so we haven't even heard about Chelsea buns. Actually I don't think we have some kind of sweet buns here. We have a few varieties of savoury ones but I can't remember of a sweet type.

After googling it we found that the perfect chelsea bun must to be rolled into a square spiral shape, although I'm not sure if we managed to do this right. No matter how square we tried to shape them they looked quite rounded, but whatever, they were still pretty good and finger licking. Of course we skipped the traditional glaze(as it's not our type of thing) and instead we glazed those buns with translucent quince jelly for keeping them shiny and served them with a puree of poached quinces. I know, I know, we've ruined the whole British classic, but it's really worth to try it.


Chelsea Buns Recipe:
  • 225gr strong white bread flour;
  • 25gr caster sugar;
  • 1/4 tsp salt (4 gr);
  • 25gr softened butter - this is for the dough;
  • 1 1/2 tsp fast action dried yeast (2 gr);
  • 1 medium egg, beaten;
  • 90ml warm semi-skimmed milk;
  • zest of one lemon;
  • 25gr butter really softened, but not melted - this is for the filling;
  • 65gr light muscovado sugar;
  • 115gr dried fruits (we used a mix of dry raisins, apricots, chokeberries and cranberries).
Combine the flour, sugar, lemon zest, salt and yeast into a mixing bowl. Make a well in the centre and add the softened butter, egg and milk. Mix to make a soft dough.

Knead until smooth. Cover and prove until doubled in size.

Generously butter and line a 7” square tin.

Flour your work surface, and roll out the dough to a rectangle measuring about 12 x 9 inches. If you get the edges as square as you can it will help to make your buns look even.

Spread the softened butter as evenly as you can over the dough. Sprinkle the sugar and the dried fruits on top, and gently press it into the butter.

Now, roll up the dough along the long edge, as though you were making a Swiss Roll. Seal the edge. Turn the roll over so that the seal is underneath and divide the roll into 9 equal buns.

Place the buns, cut side down, into the buttered and lined tin, and leave to prove until the dough has doubled in size, and they have all joined together into one big Chelsea bun muddle.

Bake in a preheated to 180 C oven, for about 20 - 25 minutes. Once cooked, cool on a wire rack, and eat them as soon as you dare.


Wednesday, October 27, 2010

Doughnuts for October's DB Challenge


October has past so fast that I haven't even realized it yet. This morning I remembered we haven't made the Daring Bakers' challenge and it was already the posting date, so we've got down to work. Lori of Butter Me Up was the host of October's DB challenge and she chose for us some doughnuts recipes. We had some fresh yeast in the fridge so we decided to try Alton Brown's yeast doughnuts. And here they are – sizzling hot. The bigger, those with the hole and the classic doughnut look we filled with a savoury mix of cream cheese, pesto and olive paste – what can I say – there's nothing better than a savoury doughnut. And the small rounds are full with home made apricot jam.


And honestly, I'm never gonna make these again!

Ok, at least not very soon.

I just can't stop myself of eating them.

Hey, how this came to my hand?

And, oops, again.

Ok, this is the last one!

Not kidding, the last one!

Or maybe just after this one...

Yeast Doughnuts Recipe:
Adapted from Alton Brown
  • 180 ml milk;
  • 35 gm butter;
  • 7 gm active dry yeast (or 15 gr fresh yeast);
  • 40 ml lukewarm water;
  • 1 egg (beaten);
  • 28 gr white granulated sugar;
  • 5 gr table salt;
  • 1 big pinch of freshly grated nutmeg;
  • zest of one lemon;
  • 350 gr all purpose flour + extra for dusting surface;
  • Flavourless oil for frying.
Heat the milk just until warm enough to melt the butter.

Place the butter in a bowl and pour warmed milk over. Set aside.

In a small bowl, sprinkle the yeast over the lukewarm water and let dissolve for 5 minutes then pour into the large bowl of a stand mixer and add the milk and butter mixture, first making sure the milk and shortening mixture has cooled to lukewarm.

Add the eggs, sugar, salt, nutmeg, lemon zest and half of the flour. Using the paddle attachment of your mixer (if you have one), combine the ingredients on low speed until flour is incorporated and then turn the speed up to medium and beat until well combined.

Add the remaining flour, combining on low speed at first, and then increase the speed to medium and beat well.

Change to the dough hook attachment of the mixer and beat on medium speed until the dough pulls away from the bowl and becomes smooth, approximately 3 to 4 minutes. If you do not have a dough hook/stand mixer – knead until the dough is smooth and not sticky. (We used a hand mixer and then kneaded by hand).

Transfer to a well-oiled bowl, cover, and let rise until doubled in size (1 to 2 hours).

On a well-floured surface, roll out dough to 9 mm thick. (Make sure the surface is well-floured otherwise your doughnuts will stick to the counter).

Cut out dough using a doughnut cutter or pastry ring, or drinking glass and using a smaller ring for the center hole. Set on floured baking sheet, cover lightly with a towel, and let rise for 30 minutes.

Preheat the oil in a deep fryer or Dutch oven to 185°C.

Gently place the doughnuts into the oil, 3 to 4 at a time. Cook until golden brown from both sides.


Thursday, October 14, 2010

Chocolate Molten Cake with Caramel Heart


After returning from the countryside last week the whole kitchen was full of fresh vegetables and fruits waiting their turn to be processed, pickled, cut, frozen, cured, etc. Plus, we finally received the long expected wooden doors for the new kitchen cabinets that Ivan and his father made. And now there's a lot of work to be done since the doors are not even polished. We wanted the doors to be wooden, painted in white but the wood structure to be visible and looking like old piece, and all this done with eco friendly materials. Oh, it's complicated, thus no carpenter agreed to take the order, so now we are trying to make it by ourselves. But it's a lot of work and our home is a total mess, but at least it smells like a pine forest.


So we haven't baked much lately, barring a pumpkin pastry with home made phyllo dough which although ashamed I have to admit that I forgot in the oven way too long, and, let say it that way, it wasn't appropriate for publishing.

Besides watching all the past series of Top Chef Just Dessert in two days makes you crave and yearn for baking. It was time to brake the baking silence and to indulge our sweet crave as well.

Chocolate molten cake is something we make when we long for a quick and easy warming chocolate treat. We are keeping a jar of the caramel sauce within easy reach in the fridge. And usually we are making only a fourth of the recipe which makes enough for two small ramequins. And usually at the end I'm licking the plate and if Ivan isn't watching me I'm licking his plate too, yup, it's that good.


Chocolate Molten Cake with Caramel Heart Recipe:
Serves 6 – 8 depending on the ramequins size

For the Caramel Heart:
  • 40 gr sugar;
  • 20 gr glucose;
  • 90 gr heavy cream;
  • pinch of sea salt crystals;
  • 1gr gum arabic + 20 gr water (optional).
Dissolve the gum arabic in the water then add to the heavy cream.
Make a dry caramel of sugar and glucose then pour in the heavy cream. Be careful as it's very hot and bubbles. At the last moment add the sea salt.
Put in a jar and refrigerate for at least one hour or until neaded.
Gum arabic develops the consistency but it's use is optional, so if not available omit it.


For the Molten Chocolate Cake:
  • 100 gr butter;
  • 160 gr dark chocolate (we used Cacao Barry's Mexique chocolate);
  • 4 eggs;
  • 60 gr confectioner's sugar;
  • 40 gr cake flour;
  • 20 gr corn starch;
  • butter and cacao powder for the ramequins.
Preheat the oven to 200º C
Butter and dust with cacao powder 6 ramequins (ours are small so the mixture makes enough for 8). Espresso cups could either be used.

Sift together the dry ingredients – sugar, flour and starch.

In another bowl whisk the eggs just enough to break and homogenize them.

Melt the butter and the chocolate. Let cool then mix in the eggs. Add the dry ingredients and mix just until combined.

Fill till half the ramequins with the chocolate mixture. Place a teaspoon of the caramel in the middle then top up with the rest of the chocolate mixture. Bake for 10 – 11 minutes. Plate and garnish with caramel ornaments and sea salt, if desired.


Friday, October 8, 2010

Plum Jelly and Yoghurt-Aniseed Mousse on an Almond-Walnut Dacquoise Base


We've spent last weekend in Vetren – a small village near Silistra. Ivan's parents had built their summer house there several years ago and now they live there from april till november. This was a great milestone in their life that changed them thoroughly. Hoeing the garden, planting fruits and vegetables, nipping off tomatoes' side shoots, mowing the grass, weeding, cultivating the soil – all this was a total outfield for them. But now they have a compost heap in the backyard all kinds of fruit trees, berries, herb beds and veggies. There are two huge flower beds in the front yard and a lovely meadow, where I love to walk barefooted. It's a really trim garden.

I love going to Vetren. Working in the garden, weeding, picking up fresh vegetables, swimming in the pool, reading or writing surrounded by pure nature. And it's so relaxing and refreshing. The only thing I miss there is internet but it's not that big deal after all. And even the huge populations of mosquitoes don't bother me when there is such a peace of mind.


Last saturday it was Ivan's mother birthday party and there was plenty of work to be done in the kitchen so we went a day earlier to give them a hand. Ivan helped his father with the baking of a whole stuffed suckling pig into the wood-fired masonry oven(for photos see the Facebook page), then he decided he could bake some bread there. We are baking bread all too often but this one was a totally different thing – flavour, taste, crust – everything was different and radtastically awesome(so it's understandable why it disappeared as soon as it was served).


It was our honour to make the birthday cake. With raspberries – freshly picked from the garden and free range eggs from our kind neighbour Iliika, who always sends us loads of fresh products. Unfortunately there was no time for taking photos, since the cake was quickly devoured as well.

But we have another cake to share with you - plum jelly and yoghurt-aniseed mousse on an almond-walnut dacquoise base with a coconut hint (wow, maybe it's easier to give it a name instead of writing such a long title).

We made these cakes the day before heading for Silistra and there was no time to write about them. But since they were goloptious they are worth sharing.


Plum Jelly and Yoghurt-Aniseed Mousse on an Almond-Walnut Dacquoise Base Recipe:
Makes 6  7cm mini cakes

For the Almond-Walnut Dacquoise:
  • 2 egg whites(room temperature) – around 60 grams;
  • 50 gr granulated sugar;
  • 25 gr ground walnuts;
  • 30 gr ground almonds;
  • 10 gr all purpose flour;
  • 15 gr coconut milk powder (it gives a slight coconut hint but it's not necessary to include it) ;
  • Butter and flour for the baking pan.
Preheat the oven to 150º C and place the rack in the middle. Line with paper, butter and flour 24x18 cm baking pan.

In a bowl mix the ground walnuts and almonds, flour and coconut milk powder. Set aside.

With an electric mixer beat the egg whites to a foam. Gradually add the sugar and beat till stiff and glossy peaks. Remove the beaters and carefully fold in the other ingredients. Bake for around 12 – 15 minutes.

For the Yoghurt-Aniseed Mousse:
  • 150 gr whole milk;
  • 1 heaped tsp aniseeds;
  • 60 gr granulated sugar;
  • 5 gr (1 tsp) powdered agar agar;
  • 300 gr yoghurt (we used 2%);
  • 180 gr whipping cream
Bring the milk to a simmer in a small saucepan. Add the aniseeds and leave to infuse for half an hour. Pass through a sieve, discard the aniseeds and bring the milk to a simmer once again. Combine the sugar and the agar agar powder (in order to prevent forming of jelly lumps) and add them to the simmering milk stirring constantly. The temperature should be above 85º C for agar agar to melt. When the sugar is thoroughly dissolved, remove from the heat. Add in the yoghurt and mix to combine. Whip the cream and mix it well with the yoghurt mix

For the Plum Jelly:
  • 800 gr pitted plums (we used Golden plums but any others plums(berries, pears, mangos, etc) will work too;
  • 80 gr granulated sugar (you can adjust it to your taste);
  • 10 gr powdered agar agar(if using sourer fruits more agar agar needs to be added);
  • 30 gr rum.
Puree the plums in a food processor, then pass through a fine sieve. Pour the plum puree into a small saucepan and bring to a simmer. Combine the sugar and the agar agar powder and add them to the plum puree.(the temperature again should reach 85º C for agar agar to melt) Add in the rum. Stir a couple more minutes till all the sugar is dissolved. Let slightly cool before using, but be aware since the agar agar starts to solidify at around 40º C.

To assemble:
Using a 7cm ring cut out 6 rounds from the dacquoise. Place all dacquoise rounds in their ring (here we used 3 cm tall rings) then pour over the yoghurt mousse leaving 0,5cm to the top. Place in the fridge for an hour to set. Then pour the plum mixture to the top of the rings. Again, place in the fridge to set. It's better to let the cakes rest several hours (or overnight) before eating.


Tuesday, September 28, 2010

Polenta Bread Fresh from the Oven


For the September's Fresh from the Oven Challenge we had to make polenta bread. The hostess - Becky from Fraxknits chose a recipe by Christine Ingram and Jennie Shapter. The recipe included some pine nuts but we were out of stock, so replaced them with pumpkin seeds. And as we were in the middle of drying Capia peppers, we added two tablespoons of chopped dry peppers. So the bread turned in really vivid colours – yellow from the polenta, green from the pumpkin seeds and red from the peppers.


Polenta bread is a bread I associate with my childhood. I and Ivan grew up in Silistra – a beautiful small town in north-east Bulgaria that lies on the southern bank of the lower Danube at the border with Romania. In the past Silistra had been occupied by the romanians and there was a great intercultural interaction there. Ivan's grandmother, for example, had attended only romanian school and later when the occupation was over she had to learn to write in bulgarian, but she still uses a lot of romanian words.


Such an interaction could be found in the cuisine too. When I was a child my grandmother used to make malai (the romanian equivalent of polenta bread) and mamaliga (cooked polenta). In the other parts of Bulgaria polenta is called kachamak. Quite a mess.

Thinking now, polenta bread is not so common anymore. Mum still makes it sometimes but there aren't many other people taking up with this, which is a pity.


Polenta Bread
Recipe:
Adapted from “Bread” by Christine Ingram and Jennie Shapter
Makes 1 loaf
  • 50gr polenta;
  • 300ml lukewarm water (divided 250 + 50 ml);
  • 15gr fresh yeast (or 5gr active dry yeast);
  • 1/2 tsp clear honey;
  • 225gr white bread flour (divided 115 + 110gr) – we had to add 50 more grams of flour;
  • 25gr butter;
  • 3 Tbsp pine nuts (we used chopped pumpkin seeds);
  • 1 and 1/2 tsp salt;
  • 2 Tbsp chopped dry red Capia pepper(but fresh one would work too).
For the topping:
  • 1 egg yolk;
  • 1 Tbsp water;
  • pine nuts for sprinkling (pumpkin seeds again, this time whole ones).
Mix the polenta and 250ml of the water together in a pan and slowly bring to boil, stirring continuously with a large wooden spoon. Reduce the heat and simmer for 2-3 minutes, stirring occasionally. Set aside to cool for 10 minutes, or until just warm.

In a small bowl, mix the yeast with the remaining water and honey until creamy/frothy (depending on the yeast being fresh/dry). Sift 115g of the flour into a larger bowl. Gradually beat in the yeast mixture, then gradually stir in the polenta mixture to combine. Turn out on to a lightly floured surface and knead for 5 minutes until smooth and elastic. (We skipped this kneading as the dough was too wet, but it was ok)

Cover the bowl and leave the dough to rise in a warm place for 2 hours or until it has doubled in bulk.

Melt the butter in a small pan add the pine nuts (pumpkin seeds in our case) and cook over a medium heat. Set aside to cool.

Add the pine nuts cooked in butter (and the butter), the chopped dry peppers and the remaining flour and salt to the polenta dough and mix to a soft dough Turn out on to a lightly floured surface and knead for 5 minutes until smooth and elastic. (Here we had to add 50 more grams of flour to form a dough suitable for kneading.)

Place the dough in the bowl again, cover with the lid and leave to rise in a warm place for about 1 hour or until doubled in bulk.

Knock back (punch down) and turn the dough out on to a lightly floured surface. Cut the dough into two equal pieces and roll each piece into a fat sausage about 38 cm/15 inches long. Plait (braid) together the two pieces and place on a lightly greased baking sheet. Cover and leave in a warm place for 45 minutes. Pre-heat the oven to 200º C.

Mix the egg yolk and water and brush over the loaf. Sprinkle with the pumpkin seeds and bake for 30 minutes or until golden and sounding hollow when tapped on the base. Cool on a wire rack.


Monday, September 27, 2010

Natural Colours from Our Pantry


Decorated Sugar Cookies using royal icing was the September 2010 Daring Bakers’ challenge which was hosted by Mandy of What the Fruitcake?!.

I'd rather prefer to top the cookies with some fruits and bake them that way. Besides, considering my hate-type relationship with the meringue flavoured sweets and the fact that royal icing gives this taste, at the first place I wasn't so keen about this challenge. But then I thought, it's a nice occasion to experiment with natural colours for the icing.


In the past only natural colours had been used – variety of extracts from plants, fruits or animal products. But in 1856 William Perkin (who was only 18 years old at this time) discovered the first synthetic dye while he was experimenting to synthesize a medicine for treating malaria. At the beginning the synthetic dyes were used only in the production of textiles but in 1900 for the needs of the food industry in the USA there were already used around 80 synthetic dyes which were mainly derived from coal tar.


Many of the synthetic dyes are azoic dyes. In 1937 researches had been started due to the arising suspicions that those dyes (particularly the ones that derive from benzidine and its derivatives) cause bladder and pancreatic cancer. Today there are less azo dyes used in the food industry but the question about their safety is still open. After all, colours are considered as one of the most dangerous food additives. They are linked to many diseases as cancer, asthma, hyperactivity, all kinds of allergies.

Often when used in the commercial foods, on the label, colours are hidden under their E number. E-numbers from 100 to 199 show the existence of colouring agents in the foods. And they could be found almost everywhere – from candies to canned foods, wine and baked goods.

Labelled as “food colourants” colouring agents are sold in many forms – powders, gels, liquids. But never mind how these are named, they are mainly of synthetic origin (if the label doesn't say something else).


However, there are so many plants, fruits, vegetables, herbs and flowers that could be used as a colouring agents. Especially when cooking and baking at home.

And so this challenge became as a project for creating food colours from the products we had in the pantry. I forgot to mention that the theme for the decorated cookies was September. So the colours that sprang up in our heads were red, orange, yellow, brown and faded green.

What to obtain them from?

Beetroot for red, ground safflower (or carrot juice) for orange-yellow, ground green tea for green, dutch processed cacao powder for brown. (At the end we didn't use the brown but the colour was very good). This was what we had in the pantry at that time, but it worked fine.


Basic Sugar Cookies Recipe:
Adapted from Peggy Porschen
Makes Approximately 36x 10cm / 4" Cookies
  • 200gr butter, at room temperature;
  • 400gr all purpose flour;
  • 200gr caster sugar;
  • 1 large egg, lightly beaten;
  • zest of one lime.
Cream together the butter, sugar and the lime zest. Beat until just becoming creamy in texture. Beat in the egg until well combined. Remove the beaters. Add the sifted flour and mix with a (wooden) spoon until a non sticky dough forms. Divide the dough into 2 or 3 pieces, form them as bricks, place them in airtight bowl and then in the fridge for at least 30 minutes to chill

Once chilled, roll the dough out on a lightly floured surface. Cut out shapes with cookie cutters or a sharp knife. Re-roll scraps and follow the above process until all scraps are used up. Arrange cookies on parchment or silicon lined baking sheets and refrigerate for another 30mins to an hour. Preheat the oven to 180°C .

Bake until golden around the edges, about 8-15mins depending on the size of the cookies. Leave to cool on cooling racks. Once completely cooled, decorate as desired.


Royal Icing Recipe:
Adapted from Joy of Baking
  • 2 large (60 gr) egg whites;
  • 2 teaspoons fresh lemon juice;
  • 330 gr confectioners (powdered or icing) sugar, sifted;
  • beetroot juice for red colour;
  • safflower for yellow colour;
  • green tea (we used kukicha) for faded green;
  • cacao powder for brown.
With an electric mixer beat the egg whites with the lemon juice until combined. Add the sifted powdered sugar and beat on low speed until combined and smooth. The icing needs to be used immediately or transferred to an airtight container as royal icing hardens when exposed to air.

Pour the icing in several small bowls and combine with the colour bringing ingredients.

Notes:
The safflower and the green tea should be preliminary ground in a mortar.
When using beetroot juice it's needed to add more confectioners sugar to the icing to compensate the added liquid.


Tuesday, September 21, 2010

Safflower Macarons with Lime – Kukicha White Chocolate Cream Cheese Ganache


After coping with the humidity factor churning out macarons became a great fun. We amuse ourselves by creating scrumptious combinations of natural colours and flavours. It's always interesting to experiment with colourful ingredients. This time on the spot is the safflower.

Safflower is one of humanity's oldest crops used as a colouring agent. In the past, before the appearance of the cheaper aniline dyes, safflower had been used for colouring foods and fabrics. The colour it gives ranges from yellow to red nuances. We like using it as a food colourant as it has a mild floral flavour. Besides those little flowers are more than adorable.


We've made the macaron shells in the evening and had no idea about what filling to use, or rather we had so many ideas that it was hard to choose from. But after a good sleep the filling came to its place.


The lime zest has more pungent and distinctive flavour than the lemon one and harmonize very zen with the safflower. The addition of the kukicha tea suppress part of the sweetness of the white chocolate and gives a grassy nuance to the flavour complex. And the cream cheese lighten the ganache.


Safflower Macarons Recipe:
Makes 34 3cm macarons (68 shells)

Note: For the meringues we used the following proportions - 1,22 gr almonds / 2,4 gr sugar per every gram of egg whites.
All the ingredients were weighed out after dehydrating.

  • 82 gr egg whites (3-days aged);
  • 15 gr granulated sugar;
  • 100 gr blanched almonds;
  • 197 gr powdered sugar;
  • 1 heaped Tbsp safflower;
  • additional safflower for sprinkling on top.
In a mortar grind the safflower to a fine powder. If needed sieve it as there are fine stalks that remain.

In a food processor grind the almonds till coarse semolina size. Add in the powdered sugar and grind finely. Add the safflower powder and pulse 2-3 times to blend. Sift the mix to remove any clumps.

In a large bowl begin beating the egg whites on a low speed. When they are foamy gradually add the granulated sugar. If necessary increase the speed to medium (but not high). Beat till glossy meringue.

Remove the beaters. Add the almonds/sugar mixture in two or three times and fold carefully until homogenous.

Line a baking pan with paper. Pour the batter into a pastry bag fitted with a plain tip (we use № 7) and pipe about 3cm large rounds leaving 2cm space between them. Tap the pan on the counter several times to bring up any air bubbles. Sprinkle some safflower on top.

Let the macarons rest for 30 – 45 minutes to form a skin. At the end they should not be tacky on touch.

Preheat the oven to 160º C. When the shells are no more tacky on touch, bake for 10-12 minutes.

Remove from the paper and let cool on a wire rack. (If not using immediately, store the shells in an airtight container.)


Lime – Kukicha White Chocolate Cream Cheese Ganache Recipe:
  • 50 gr heavy cream;
  • 100 gr white chocolate;
  • 50 gr butter;
  • 100 gr cream cheese;
  • zest of 1 lime;
  • 1 leveled tsp kukicha tea.
In a mortar grind the kukicha tea to a fine powder.

Bring the cream to a simmer. Then pour the hot cream over the chocolate. Wait for a minute, then stir to obtain a smooth ganache. When the temperature falls to 50ºC add in the butter cut into small pieces. Mix well.

With an electric mixer beat the cream cheese, lime zest and powdered kukicha tea. Add in the ganache and beat till combined.


To assemble: Fill a pastry bag with the ganache and couple the macaron shells with a good twist of ganache. Store the macarons in an airtight container in the fridge. Let them rest for 24 hours before eating.