Tuesday, September 28, 2010

Polenta Bread Fresh from the Oven


For the September's Fresh from the Oven Challenge we had to make polenta bread. The hostess - Becky from Fraxknits chose a recipe by Christine Ingram and Jennie Shapter. The recipe included some pine nuts but we were out of stock, so replaced them with pumpkin seeds. And as we were in the middle of drying Capia peppers, we added two tablespoons of chopped dry peppers. So the bread turned in really vivid colours – yellow from the polenta, green from the pumpkin seeds and red from the peppers.


Polenta bread is a bread I associate with my childhood. I and Ivan grew up in Silistra – a beautiful small town in north-east Bulgaria that lies on the southern bank of the lower Danube at the border with Romania. In the past Silistra had been occupied by the romanians and there was a great intercultural interaction there. Ivan's grandmother, for example, had attended only romanian school and later when the occupation was over she had to learn to write in bulgarian, but she still uses a lot of romanian words.


Such an interaction could be found in the cuisine too. When I was a child my grandmother used to make malai (the romanian equivalent of polenta bread) and mamaliga (cooked polenta). In the other parts of Bulgaria polenta is called kachamak. Quite a mess.

Thinking now, polenta bread is not so common anymore. Mum still makes it sometimes but there aren't many other people taking up with this, which is a pity.


Polenta Bread
Recipe:
Adapted from “Bread” by Christine Ingram and Jennie Shapter
Makes 1 loaf
  • 50gr polenta;
  • 300ml lukewarm water (divided 250 + 50 ml);
  • 15gr fresh yeast (or 5gr active dry yeast);
  • 1/2 tsp clear honey;
  • 225gr white bread flour (divided 115 + 110gr) – we had to add 50 more grams of flour;
  • 25gr butter;
  • 3 Tbsp pine nuts (we used chopped pumpkin seeds);
  • 1 and 1/2 tsp salt;
  • 2 Tbsp chopped dry red Capia pepper(but fresh one would work too).
For the topping:
  • 1 egg yolk;
  • 1 Tbsp water;
  • pine nuts for sprinkling (pumpkin seeds again, this time whole ones).
Mix the polenta and 250ml of the water together in a pan and slowly bring to boil, stirring continuously with a large wooden spoon. Reduce the heat and simmer for 2-3 minutes, stirring occasionally. Set aside to cool for 10 minutes, or until just warm.

In a small bowl, mix the yeast with the remaining water and honey until creamy/frothy (depending on the yeast being fresh/dry). Sift 115g of the flour into a larger bowl. Gradually beat in the yeast mixture, then gradually stir in the polenta mixture to combine. Turn out on to a lightly floured surface and knead for 5 minutes until smooth and elastic. (We skipped this kneading as the dough was too wet, but it was ok)

Cover the bowl and leave the dough to rise in a warm place for 2 hours or until it has doubled in bulk.

Melt the butter in a small pan add the pine nuts (pumpkin seeds in our case) and cook over a medium heat. Set aside to cool.

Add the pine nuts cooked in butter (and the butter), the chopped dry peppers and the remaining flour and salt to the polenta dough and mix to a soft dough Turn out on to a lightly floured surface and knead for 5 minutes until smooth and elastic. (Here we had to add 50 more grams of flour to form a dough suitable for kneading.)

Place the dough in the bowl again, cover with the lid and leave to rise in a warm place for about 1 hour or until doubled in bulk.

Knock back (punch down) and turn the dough out on to a lightly floured surface. Cut the dough into two equal pieces and roll each piece into a fat sausage about 38 cm/15 inches long. Plait (braid) together the two pieces and place on a lightly greased baking sheet. Cover and leave in a warm place for 45 minutes. Pre-heat the oven to 200º C.

Mix the egg yolk and water and brush over the loaf. Sprinkle with the pumpkin seeds and bake for 30 minutes or until golden and sounding hollow when tapped on the base. Cool on a wire rack.


Monday, September 27, 2010

Natural Colours from Our Pantry


Decorated Sugar Cookies using royal icing was the September 2010 Daring Bakers’ challenge which was hosted by Mandy of What the Fruitcake?!.

I'd rather prefer to top the cookies with some fruits and bake them that way. Besides, considering my hate-type relationship with the meringue flavoured sweets and the fact that royal icing gives this taste, at the first place I wasn't so keen about this challenge. But then I thought, it's a nice occasion to experiment with natural colours for the icing.


In the past only natural colours had been used – variety of extracts from plants, fruits or animal products. But in 1856 William Perkin (who was only 18 years old at this time) discovered the first synthetic dye while he was experimenting to synthesize a medicine for treating malaria. At the beginning the synthetic dyes were used only in the production of textiles but in 1900 for the needs of the food industry in the USA there were already used around 80 synthetic dyes which were mainly derived from coal tar.


Many of the synthetic dyes are azoic dyes. In 1937 researches had been started due to the arising suspicions that those dyes (particularly the ones that derive from benzidine and its derivatives) cause bladder and pancreatic cancer. Today there are less azo dyes used in the food industry but the question about their safety is still open. After all, colours are considered as one of the most dangerous food additives. They are linked to many diseases as cancer, asthma, hyperactivity, all kinds of allergies.

Often when used in the commercial foods, on the label, colours are hidden under their E number. E-numbers from 100 to 199 show the existence of colouring agents in the foods. And they could be found almost everywhere – from candies to canned foods, wine and baked goods.

Labelled as “food colourants” colouring agents are sold in many forms – powders, gels, liquids. But never mind how these are named, they are mainly of synthetic origin (if the label doesn't say something else).


However, there are so many plants, fruits, vegetables, herbs and flowers that could be used as a colouring agents. Especially when cooking and baking at home.

And so this challenge became as a project for creating food colours from the products we had in the pantry. I forgot to mention that the theme for the decorated cookies was September. So the colours that sprang up in our heads were red, orange, yellow, brown and faded green.

What to obtain them from?

Beetroot for red, ground safflower (or carrot juice) for orange-yellow, ground green tea for green, dutch processed cacao powder for brown. (At the end we didn't use the brown but the colour was very good). This was what we had in the pantry at that time, but it worked fine.


Basic Sugar Cookies Recipe:
Adapted from Peggy Porschen
Makes Approximately 36x 10cm / 4" Cookies
  • 200gr butter, at room temperature;
  • 400gr all purpose flour;
  • 200gr caster sugar;
  • 1 large egg, lightly beaten;
  • zest of one lime.
Cream together the butter, sugar and the lime zest. Beat until just becoming creamy in texture. Beat in the egg until well combined. Remove the beaters. Add the sifted flour and mix with a (wooden) spoon until a non sticky dough forms. Divide the dough into 2 or 3 pieces, form them as bricks, place them in airtight bowl and then in the fridge for at least 30 minutes to chill

Once chilled, roll the dough out on a lightly floured surface. Cut out shapes with cookie cutters or a sharp knife. Re-roll scraps and follow the above process until all scraps are used up. Arrange cookies on parchment or silicon lined baking sheets and refrigerate for another 30mins to an hour. Preheat the oven to 180°C .

Bake until golden around the edges, about 8-15mins depending on the size of the cookies. Leave to cool on cooling racks. Once completely cooled, decorate as desired.


Royal Icing Recipe:
Adapted from Joy of Baking
  • 2 large (60 gr) egg whites;
  • 2 teaspoons fresh lemon juice;
  • 330 gr confectioners (powdered or icing) sugar, sifted;
  • beetroot juice for red colour;
  • safflower for yellow colour;
  • green tea (we used kukicha) for faded green;
  • cacao powder for brown.
With an electric mixer beat the egg whites with the lemon juice until combined. Add the sifted powdered sugar and beat on low speed until combined and smooth. The icing needs to be used immediately or transferred to an airtight container as royal icing hardens when exposed to air.

Pour the icing in several small bowls and combine with the colour bringing ingredients.

Notes:
The safflower and the green tea should be preliminary ground in a mortar.
When using beetroot juice it's needed to add more confectioners sugar to the icing to compensate the added liquid.


Tuesday, September 21, 2010

Safflower Macarons with Lime – Kukicha White Chocolate Cream Cheese Ganache


After coping with the humidity factor churning out macarons became a great fun. We amuse ourselves by creating scrumptious combinations of natural colours and flavours. It's always interesting to experiment with colourful ingredients. This time on the spot is the safflower.

Safflower is one of humanity's oldest crops used as a colouring agent. In the past, before the appearance of the cheaper aniline dyes, safflower had been used for colouring foods and fabrics. The colour it gives ranges from yellow to red nuances. We like using it as a food colourant as it has a mild floral flavour. Besides those little flowers are more than adorable.


We've made the macaron shells in the evening and had no idea about what filling to use, or rather we had so many ideas that it was hard to choose from. But after a good sleep the filling came to its place.


The lime zest has more pungent and distinctive flavour than the lemon one and harmonize very zen with the safflower. The addition of the kukicha tea suppress part of the sweetness of the white chocolate and gives a grassy nuance to the flavour complex. And the cream cheese lighten the ganache.


Safflower Macarons Recipe:
Makes 34 3cm macarons (68 shells)

Note: For the meringues we used the following proportions - 1,22 gr almonds / 2,4 gr sugar per every gram of egg whites.
All the ingredients were weighed out after dehydrating.

  • 82 gr egg whites (3-days aged);
  • 15 gr granulated sugar;
  • 100 gr blanched almonds;
  • 197 gr powdered sugar;
  • 1 heaped Tbsp safflower;
  • additional safflower for sprinkling on top.
In a mortar grind the safflower to a fine powder. If needed sieve it as there are fine stalks that remain.

In a food processor grind the almonds till coarse semolina size. Add in the powdered sugar and grind finely. Add the safflower powder and pulse 2-3 times to blend. Sift the mix to remove any clumps.

In a large bowl begin beating the egg whites on a low speed. When they are foamy gradually add the granulated sugar. If necessary increase the speed to medium (but not high). Beat till glossy meringue.

Remove the beaters. Add the almonds/sugar mixture in two or three times and fold carefully until homogenous.

Line a baking pan with paper. Pour the batter into a pastry bag fitted with a plain tip (we use № 7) and pipe about 3cm large rounds leaving 2cm space between them. Tap the pan on the counter several times to bring up any air bubbles. Sprinkle some safflower on top.

Let the macarons rest for 30 – 45 minutes to form a skin. At the end they should not be tacky on touch.

Preheat the oven to 160º C. When the shells are no more tacky on touch, bake for 10-12 minutes.

Remove from the paper and let cool on a wire rack. (If not using immediately, store the shells in an airtight container.)


Lime – Kukicha White Chocolate Cream Cheese Ganache Recipe:
  • 50 gr heavy cream;
  • 100 gr white chocolate;
  • 50 gr butter;
  • 100 gr cream cheese;
  • zest of 1 lime;
  • 1 leveled tsp kukicha tea.
In a mortar grind the kukicha tea to a fine powder.

Bring the cream to a simmer. Then pour the hot cream over the chocolate. Wait for a minute, then stir to obtain a smooth ganache. When the temperature falls to 50ºC add in the butter cut into small pieces. Mix well.

With an electric mixer beat the cream cheese, lime zest and powdered kukicha tea. Add in the ganache and beat till combined.


To assemble: Fill a pastry bag with the ganache and couple the macaron shells with a good twist of ganache. Store the macarons in an airtight container in the fridge. Let them rest for 24 hours before eating.

Tuesday, September 14, 2010

Date Cake with Orange Blossom Ice Cream and Fig Topping


Our fridge was packed to its capacity with dates from my parents' trip to Tunisia a couple of weeks ago. We ate a lot while still fresh but there were still two kilos of them left. And honestly, we had more than enough. We couldn't even think of eating one more date unless it was transformed into something more appealing. It's not that dates are not appealing but after devouring a certain quantity you really won't want to see them any more.

So when I found the recipe for this cake I thought it's the ideal opportunity to get rid of some of the dates and set free some place in the fridge. And I knew exactly what to pair it with.


Six years ago we were in Tunisia with my sister. Ivan had a lot of work and couldn't take a leave, so unfortunately he didn't manage to come with me, but there was my sister to replace him. For seven days there we spent half of our money for orange juice. We were drinking it all the time. Often we were taking double juices which were served in huge glasses. No ice added in order not to water down the divine nectar full of sunny light and summer spirit. Sometimes the cleanliness of the glasses was questionable but who cares. As long as they were filled with the golden liquid we were the happiest girls in the world.

This is why I wanted an orange related pairing for the cake. And the orange blossoms water came in handy here for making an ice cream. Thus the dessert was fully packed with seductive tunisian memories.

And the fig topping – I've made it on another occasion, but it happened to match very well here.


Date Cake Recipe:
Adapted from Evan's Kitchen Ramblings Makes 20 cm round cake
  • 200 gr pitted and chopped dates;
  • 300 ml water;
  • 1 tsp bicarbonate of soda;
  • 60 gr butter, at room temperature;
  • 90 gr sugar;
  • 2 eggs;
  • 100 gr all purpose flour;
  • 50 gr rice flour;
  • 1 Tbsp baking powder.
In a saucepan bring the water and the dates to a boil, then add bicarbonate of soda and stir. It'll start to bubble since the bicarbonate of soda is an alkali and neutralize the acids of the dates. Remove from heat. Let cool then blend until smooth.

Preheat the oven to 180º C. Grease and line with paper a 20cm round cake pan.

Using an electric mixer, beat butter and sugar until fluffy. Add the eggs and beat well. Fold in the flours, baking powder and the date puree until just combined.

Pour into the prepared pan and bake for about 30 minutes.

Notes: the cake here isn't as sticky as in Evan's recipe, but we aren't great fans of sticky cakes, so I baked it for a little more time – around 40 - 45 minutes. 

Orange Blossom Ice cream Recipe:
  • 300 gr whole milk;
  • 4 egg yolks;
  • 120 gr sugar;
  • 8 gr orange blossoms water;
  • 260 gr heavy cream.
In a sauce pan bring the milk to a simmer.

In a large bowl beat the yolks and sugar until light and fluffy. Pour a small part of the hot milk over the yolks to temper, then pour over the rest of the milk. Whisk well.

Cook over medium-low heat till the mixture reaches 85º C. (If making without a thermometer – the mixture should be thick enough to coat the back of a wooden spoon and the foamy layer on top should disappear). Remove from heat and let cool then add the orange blossoms water and mix well.

Whip the cream and add to the custard. Mix well with a spoon. Place in the freezer to set.

Notes: We are making the ice cream without an ice cream machine, so adding whipped cream at the end makes it more airy and fluffier.

Fig Topping Recipe:
  • 300 gr small figs;
  • 125 gr sugar;
  • 25 ml water;
  • juice of half lemon.
Combine the sugar and the water in a saucepan over medium heat. As soon as the sugar is liquefied and dissolved add the figs. If the figs are not very small, cut them in quarters. Let simmer for half an hour. Skim if any foam floats on top. Add the lemon juice and simmer for additional 5 minutes.

Saturday, September 11, 2010

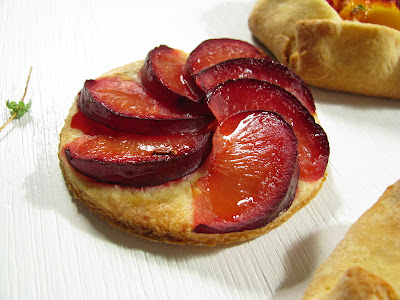
Nectarine Galettes and Plum Rosettes


This week I made this recipe twice. The first time I made the whole recipe with the eggy part, but the second time I halved the recipe to make a quick breakfast for two. And as I was in a hurry I skipped the egg and replaced the yolk with milk. There was no significant difference, so it could be done this way too.


We had our galettes on the balcony while I was trying to find the little creature that was eating my marjoram plant. It was a little caterpillar. How could this little thing eat so much?! It was thrown away as soon as it was found. But the next day there was another one. Arghh.


Nectarine Galettes and Plum Rosettes
Recipe:
Makes 4 galettes and 4 rosettes
  • 180 gr all purpose flour;
  • 60 gr rice flour (could be replaced with all purpose flour);
  • 80 gr butter;
  • 90 gr sugar;
  • 1 egg yolk (could be replaced with 20 – 25 gr of milk);
  • 50 gr cold milk;
  • pinch of salt;
  • 1 egg white for glazing (optional);
  • jam for glazing (optional). 

  • 2 small nectarines;
  • 3 plums;
  • 2 Tbsp sugar;
  • 1 Tbsp freshly chopped marjoram.
Mix the flours, sugar and salt in a large bowl. Blend in the butter with a fork or just rub it with your fingertips till small crumbs form. Add in the egg yolk and the milk and knead just until combined. Don't overwork. Gather the dough together. Form it to a brick and wrap tightly in plastic wrap or put it in a well closed bowl and then in the fridge for an hour to set.

Meanwhile cut the nectarines in 1cm cubes and place in a bowl together with the sugar and the fresh marjoram. Mix well and leave to macerate.

Cut the plums in half, remove the pits and then cut crosswise to 0.5-1cm strips. Set aside.


Preheat the oven to 180º C and position a rack in the center. Prepare a silpad or line the baking pan with paper.

Flour the counter and roll the dough out to about 3 mm thick. Cut four 8cm rounds for the plum rosettes and four 15cm rounds for the galettes. Gather the scraps of the dough and roll them out again till you cut all to rounds.
Brush the rounds with the egg whites(optional).

Arrange the plum strips onto the 8cm rounds as rosettes.
If there are any plums left cut them to smaller pieces and mix with the nectarines.

Put a couple of tablespoons of the nectarines mixture in the center of the 15cm rounds. Gather the edges of the rounds and pleat them with your fingertips. Glaze the visible dough part of the galettes with the egg white. I forgot to do so here but when glazed the galettes are shiny and glossy.

Bake approximately 25 minutes for the rosettes and 35 minutes for the galettes. While still warm brush the fruits with the liquid part of a jam with translucent colour (I used fig jam) in order to be more shiny.

Wednesday, September 8, 2010

Salted Caramel Ice Cream


We've been living on the sea coast for more than 12 years but have never gone to the beach during daytime. Burning sun, crowds of tourists making fuss, sweat and sand sticking on your body – it's just not for us. The comfort of the kitchen, the hot oven, simmering sauce pans, the sweet odour of vanilla filling out the whole apartment – this is our world and we love it!

No, you can't find us on the beach during the day, but when the night falls the beach is our place. Lying on my pareo and watching the stars carries us away from the day fuss, makes us dream and relax under the sound of the breaking waves. The breeze is cool and refreshing and often I even fall asleep huddled up in Ivan's arms. Oh, those beach nights are really gonna miss me :(

Salted caramel ice cream is my way to say “Goodbye” to the summer. I'm not much of a summer person. I hate the heat, the burning sun, the sweltering days and the stifling nights. But I love it as a season of all those berries and stone fruits, ice cream and frozen threats, and of course the breezy nights on the beach, drinking mojito at dusk, looking for falling stars...

Oh... Bye bye summer! Welcome salted caramel ice cream!


Salted Caramel Ice Cream Recipe:
  • 300 gr sugar;
  • 10 gr mild sea salt;
  • 500 ml whole milk;
  • 400 ml heavy cream (divided 150 + 250 ml);
  • 5 egg yolks.
Place the sugar in a heavy-bottomed saucepan and caramelize it over moderate heat. When brown and smelling yummy add the sea salt and stir. Bring the 150ml of cream to a simmer and pour it over the caramel. Take the needed precautions as it's very very hot and when pouring the cream the caramel starts to bubble. Usually I do this on the counter out of the heat since I said the sugar is very hot and the hot-plate is ceramic and if caramel falls on it while it's turned on, it will get ugly.

In another sauce pan bring the milk to a simmer.

In a large bowl beat the egg yolks until light and fluffy. Pour a small part of the hot milk over the yolks to temper, then pour over the rest of the milk. Whisk well.

Pour the yolks-milk mixture over the caramel mixture. Cook over medium-low heat till the mixture reaches 85º C. (If making without a thermometer – the mixture should be thick enough to coat the back of a wooden spoon and the foamy layer on top should disappear). Remove from the heat and let cool.

Whip the remaining 250 ml of the cream and add to the cooled caramel mixture. Mix well with a spoon. Place in the freezer to set.

Notes:
We are making the ice cream without an ice cream machine, so adding whipped cream at the end makes it more airy and fluffier. If you are using an ice cream maker you can add all the cream to the caramel at the beginning.

This ice cream doesn't freeze so hard and actually is quite soft, because of the added salt and caramel, so it could be easily made without machine.


Sunday, September 5, 2010

Mini Cheese Cakes


This is one of my favourite deserts. But this winter I used to make it so often that at the end I wasn't able to love it anymore. There's been several months since I haven't even thought of making cheese cake, but when my sister was here she asked me to make it as it's one of her favorites too.

And... my old love for this cheese cake came back. I'm totally addicted again, but this time I'm trying to make it in moderation. Really, I'm trying... really hard.

Oh, who am I trying to lie to...


Mini Cheese Cakes Recipe:
  • 250 gr cream cheese;
  • 70 gr sugar;
  • 70 gr heavy cream;
  • 2 eggs;
  • jam of your choice – we are using home made blueberry jam here.
Prepare 6 oven proof glasses or jars.

Using a kitchen robot (or a mortar) make the graham crackers to crumbles. Add the butter and combine well. Pulsing a couple of times in the robot works fine.

In a large bowl beat the cream cheese and the sugar using electric mixer. Beat in the eggs and at last add the heavy cream and combine well.

Preheat the oven to 160º C.

Divide the graham cracker crumbs amongst the 6 jars and pour over the cream cheese mixture. Place the jars in a hot water bath and bake for 30 minutes.

When the baked cheese cakes are cool put some jam on top of each one.

Saturday, September 4, 2010

Cheesy Peachy Cracker Bites


After putting the fourth batch of the graham crackers in the oven I decided to break the monotony of the rectangular shape with some little rounds having in mind to use them for a multi layered dessert. Lately I enjoy making multi layered desserts with a cookie base. Besides when they are bite size small you can eat them directly with your hands.


Cheesy Peachy Cracker Bites Recipe:

For the Graham Crackers – see the recipe here

For the Cheesy Layer:
  • 125 gr cream cheese;
  • 35 gr butter;
  • 50 gr confectioners' sugar.
In a medium bowl whisk together the cream cheese and the butter until creamy, then whisk in the sifted confectioners' sugar.

For the Peachy Layer:
  • 3 peaches;
  • 1 tsp agar agar in powder;
  • 100 gr sugar (or to taste).
Note: You can substitute the agar agar for a gelatine, but since Silvia is a vegetarian we stick to the agar agar.
Peel and pit the peaches, then puree them in a food blender. In a small bowl mix well the sugar and the agar agar (to prevent forming of jellied lumps later). Put all the ingredients in a sauce pan over a medium heat. Let simmer for 5 to 10 minutes till all the sugar and agar agar are dissolved and the peach puree is well cooked. The temperature must be above 85ºC in order to melt the agar agar. Stir all the time. When ready transfer the peach jelly to a paper lined shallow pan. Make smooth with an offset spatula. Wait until cool then put the plate in the fridge to set.


To assemble:

Fill a pastry bag fitted with the tip you prefer (we used closed star tip) with the cheesy mixture and pipe nice swirls onto the graham crackers.
Using a cookie cutter with the form of the crackers cut rounds of the peach jelly and mount them on top of the cheesy layer. Then pipe again some of the cheesy mixture on top of the jelly.

Wednesday, September 1, 2010

Graham Crackers


Me: It smells like the end of the summer.

Ivan: How does the end of the summer smell like?

Me: I don't know but you can feel it in the air. There is not a specific aroma but there are many fast changing odours. The wind is colder but pleasant. Thus all the flavours are somehow cleaner and deeper, and more distinctive. Unlike at the height of the summer when it's hot and all the odours are mixed and carried away in the thick air like a haze. Unlike the winter when your nose is chilled to the bone and all you can smell is the cold and the smoke from the chimneys.

It just smells like the end of the summer. And all my olfactive sensors are in anticipation.


We are having an early dinner then we set off for a walk at nightfall. When wandering about through the streets at dinner time you can literally taste the city. It's like a secret peek in other people's kitchens.

The neighbours from the left are grilling red peppers. Two metres away you can smell french fries. A step further someone is frying fish and from the next balcony you can hear the sizzling of the steaks on the grill. A couple of doors ahead there is another classic for this time of the year in Bulgaria – fried eggplant and one could really taste the tangy tomato sauce that accompanies it.

Hey, we've just had dinner and we are hungry again with all these odours in the air.

Back home, it's baking time...Graham crackers in the oven. Sweet aroma fills the apartment and like a tiny thread it's slipping out to complement the olfactive scenery.


Graham Crackers Recipe:
Makes around 7 dozens of 3x7cm rectangular crackers.
  • 400 gr all purpose flour (half of the flour could be substituted with graham flour);
  • 150 gr Muscovado sugar;
  • 100 gr honey;
  • 5 gr salt;
  • 7 gr baking powder;
  • 100 gr butter;
  • 75 gr milk;
  • 1 Tbsp vanilla extract.
In the bowl of a food processor combine the flour, sugar, salt and baking powder and pulse a couple of times to mix well.

In a small bowl mix the milk, vanilla and the honey, then add them along with the butter cut in small pieces to the dry ingredients. Give it a couple of pulses to combine. Don't overwork it in order not to develop too much gluten. Bring the dough together and wrap tightly with plastic wrap or put it in a well closed bowl and then in the fridge to rest overnight (or at least 4 hours).

Preheat the oven to 180º C. Prepare a silpat or a paper sheet.

To roll the dough, lightly dust the counter and the rolling pin with flour. Roll the dough out to about 3-4 mm thick. Using a rolling cutter or a knife cut out 3x7cm rectangles, punch them with a fork or a skewer and transfer them to the silicon pad. Bake for 15 minutes or until golden brown in colour. Cool on a wire rack. Then store in an air tight container.

LinkWithin

Related Posts with Thumbnails